This tutorial will teach you how to create a PPTP VPN server using a Mikrotik router, from scratch. Basically, almost every SOHO Mikrotik router has a SOHO configuration by default, which in most of the cases it is enough for small office or home usage.
In the following tutorial you will see several tips and steps how to create and use the VPN server which is already part of the operating system of Mikrotik, RouterOS.
Resetting the router, without the default configuration.
Since this tutorial is about creating the PPTP Server from scratch, meaning without any configuration on the router, our first step is to reset the router.
P.S. Always upgrade your router to the latest version.
- Login to the router using winbox.exe (specialized app created by Mikrotik for accessing, configuring and maintaining RouterOS devices) which you can download it on the official website for free. Every router is factory pre-configured with the IP address 192.168.88.1/24. The default username is admin with no password.After you open the app you will need to open the Neighbors tab, which will show you your Mikrotik device (see pic)
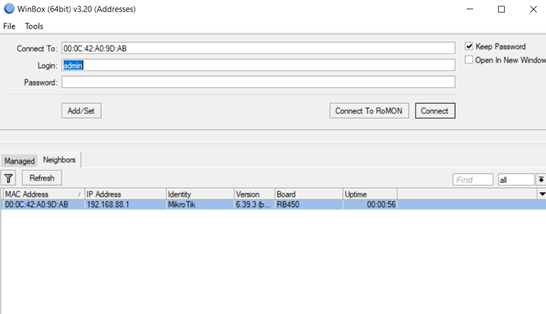
You can either you click the MAC address or the IP address and click connect to enter the router.
Tip: After you login, change the username & password of the router.
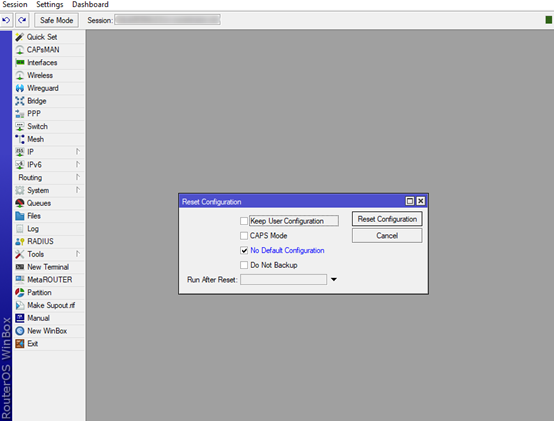
2. Next thing is the operation for resetting the router without running the default configuration. On the main menu on which is located on the left side, click System which will open additional menu with features. After that you will locate and click the Reset Configuration option which will open new window.
Check the No Default Configuration option and click the Reset Configuration Button.
After this just disconnect and reconnect on the router by clicking on the MAC address.
Configuring the device as a Router.
The following steps will setup the device to act as a Router for your network.
1.Setting up a DNS settings is one of the first step you should consider when you are creating a Router. Go to the IP tab of the main menu, look for DNS and click it, this will open new window DNS Settings.
In the Servers boxes you will need to enter the DNS servers by your choice, this will provide the router a DNS resolver. In this case we will use the most commonly used DNS servers (Google) because of their reliability and speed.
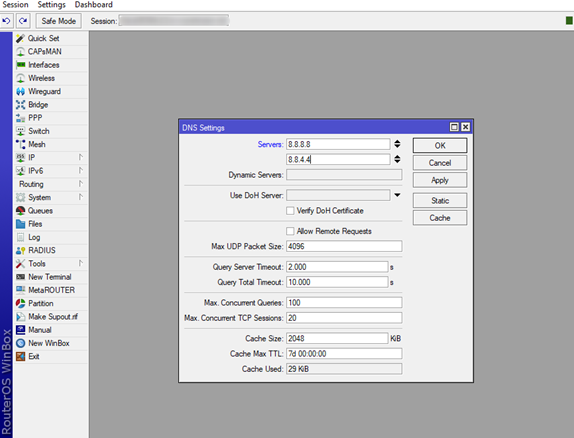
After this just click Apply and Close the tab.
2.Next step is to assign Public IP address to an interface so that the router and your network be able to access the Internet, in this case we will assume that your ISP provides dynamically assigned Public IP for your router. This can be done by accessing the IP in the main menu, look for DHCP Client option.
Next thing is to add a DHCP Client on a interface, by clicking on the + button.
Now choose the Interface where your provided is physically connected (in our case ether1)
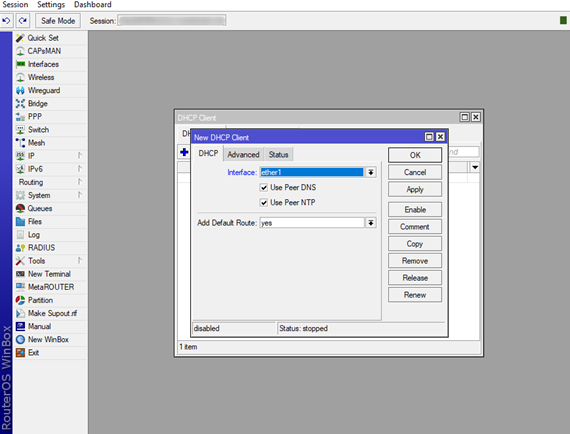
You don’t need to change anything else on this tab since there are predefined. Use Peer DNS, Use Peer NTP and Add Default Route should be as shown on the picture (you can change the settings for your need).Now your router has access to the Internet, this can be verified by using the Ping tool found in the Tools option on the main menu.
3.Next thing is creating a LAN segment on your router (Gateway), where all your local devices will be connected.
Go to the IP option and click on the Addresses button, then + and new window Address List will pop up. Now in the Address box write down your IP address which will be Gateway for your local network, our case we will assign 192.168.1.1/24 as our Gateway of the local network.
Next choose an Interface where you will connect your devices, in our case that will be ether5.

4. For our devices to be able to connect to the internet we will need to enable the NAT (Network Address Translation) feature. In our case we will use global NAT option which will enable all our local devices to get access to the Internet.
Now go to the IP on the main menu, click on the Firewall option and thena on the new window which will pop up choose the NAT tab and click the + sign.
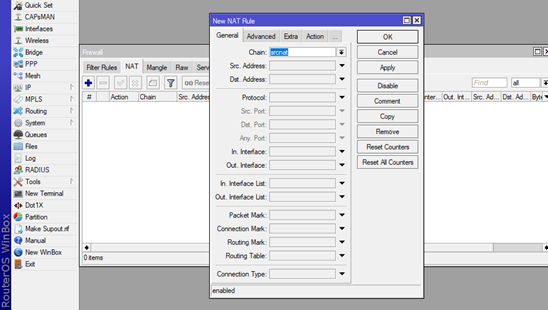
On the new window New NAT Rule, choose the General tab and choose srcnat in the Chain: box.
Next choose the Action tab, and click on the Action drop menu, look for the Masquerade option. Confirm the new rule.

And the final step is to configure the PPTP Server settings, which will allow remote users to connect to the router via virtual private network (VPN) tunnel and get access to your network devices.
Creating the PPTP VPN Server and users
There are numerous different approaches that can be used for this feature to be enabled and used depending on your needs, whether your clients will receive dynamic IP’s on their side of the tunnel or they will get statically assigned by the operator of the router and other features.
In this tutorial we will assign the IP of the users dynamically using a special pool of IP addresses which will only be used for the VPN users.
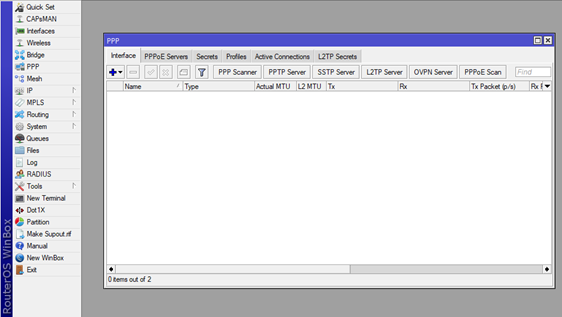
- First, we need to enable the PPTP server settings, which can be found by clicking the PPP option in the main menu. After that on the new window, choose the first tab Interfaces, then click on the PPTPServer option (see picture).
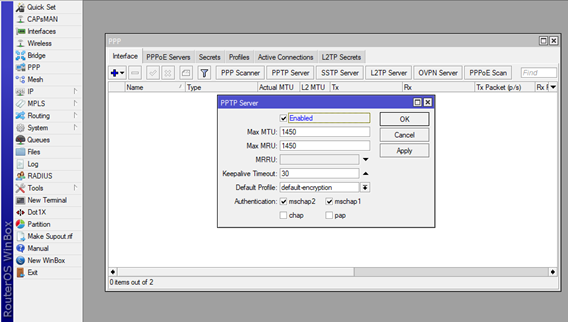
Now navigate to the newly opened window PPTP Server and click on Enabled (see pic). In this case we will use the default settings for the server which are already implemented by Mikrotik.
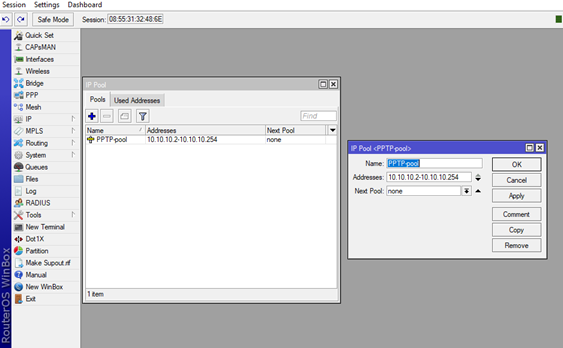
2. The next step is to create a pool which will be used to dynamically provide the users with IP addresses needed for the VPN tunnel to work. Navigate to the IP option in main menu then click on the Pool option. Now on the new window the IP Pool, click on the +and additional window will come up the New IP Pool, here we will assign the Name of the pool (PPTP-pool in our case) and in the Addresses bar you can enter your desired range of IP addresses which will be given to the VPN clients (in our case 10.10.10.2-10.10.10.254). After this just click Apply and OK and the pool will be created.
3.Now that we’ve got our VPN pool, we need to create specific profile which we take care of the PPTP clients, which IP will they get, how many clients can use the same credentials and etc.
Go to the PPP option in the main menu and navigate to the Profiles tab. Now click on the + and new window will pop up, the New PPP Profile window. In the Name tab you can name your profile (PPTP-Profile for example), add the Local Address which will be the VPN Gateway for the users (in our case 10.10.10.1 since it needs to be in the same subnet as our pool) and in the Remote Address tab click on the dropdown menu and choose the pool that we’ve already created previously (in our case PPTP-pool).

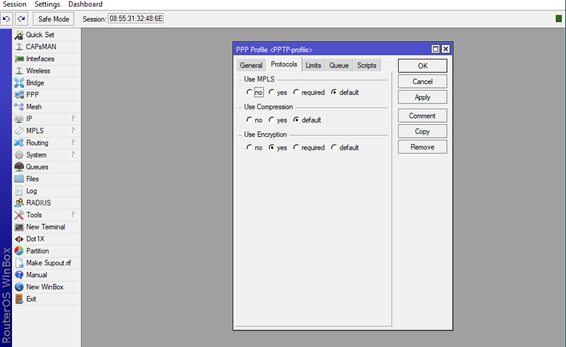
Now navigate on the second tab Protocols, and click Yes on the Use Encryption option, this will enable data encryption on this particular profile.
The last thing that we will do in the PPP Profile window is the limitation of the usage of the user’s credentials. Navigate to the next tab Limits and in the Only One option choose Yes.
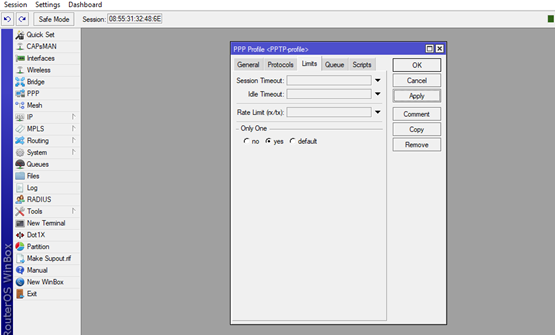
This will limit the user’s credentials to be used by one active user only.
4.The last thing that we need for this PPTP Server setup is to create credentials (Secrets) which will grant the user connection through the tunnel and access to the local network.
Navigate to the PPP option in the main menu again, and choose the Secrets tab. Now click on the +, and a new window will pop up New PPP Secret.
In the Name bar enter your client’s username (testuser in our case), in the Password bar enter the password for the client (pptpuser123!! In our case). Note that this options arecase-sensitive.
In the Service dropdown menu choose pptp since we are creating PPTP server, and in the Profile dropdown menu choose the profile which we’ve already create previously (PPTP-profile in our case).
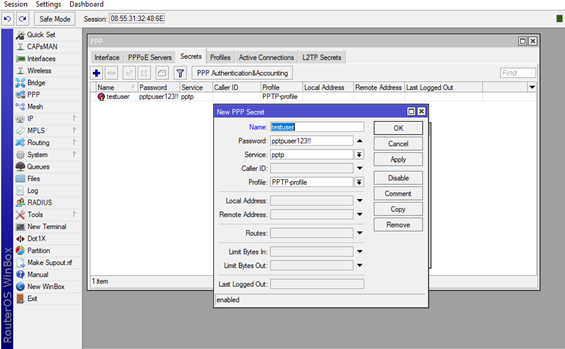
Now just click Applyand OK, your user’s secret is ready to be used.
Now your router is ready to be used as PPTP server for the outside world, the users can either use the Public IP assigned by your ISP or you can simply use Mikrotik Cloud DDNS feature which is incredibly fast and stable.
In the end few advices which will make your life easier:
- Always use additional features to secure your router (change default ports, create filter rules etc)
- Create backup and export your configuration
- Always update the device to the latest available version.